Arabic
Table of Contents
I illustrated most of the concepts in this blog post in Arabic at the following video
This doesn’t contain all the details in the post but yet will get you the fundamentals you need to proceed with the next parts.
Windows hashes
LM hashes
It was the dominating password storing algorithm on windows till windows XP/windows server 2003.
It’s disabled by default since windows vista/windows server 2008.
LM was a weak hashing algorithm for many reasons, You will figure these reasons out once You know how LM hashing works.
LM hash generation?
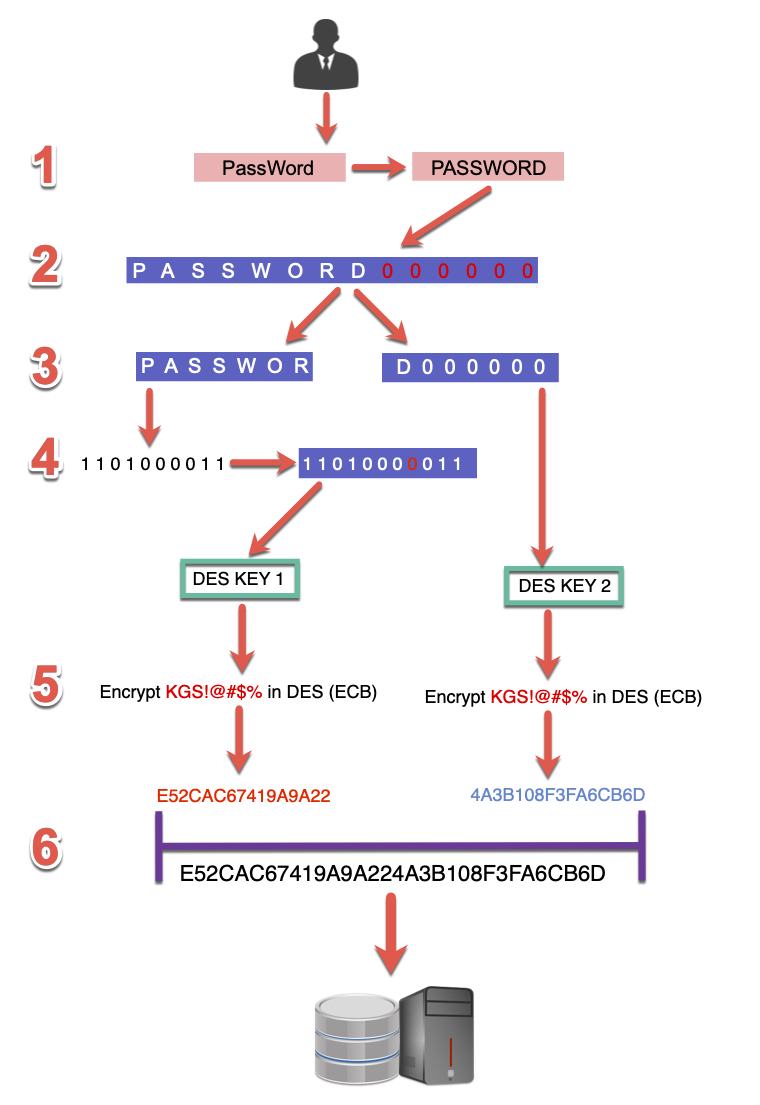
Let’s assume that the user’s password is PassWord
1 – All characters will be converted to upper case
PassWord -> PASSWORD
2 – In case the password’s length is less than 14 characters it will be padded with null characters, so its length becomes 14, so the result will be PASSWORD000000
3 – These 14 characters will be split into 2 halves
PASSWOR
D000000
4 – Each half is converted to bits, and after every 7 bits, a parity bit (0) will be added, so the result would be a 64 bits key.
1101000011 -> 11010000011
As a result, we will get two keys from the 2 pre-generated halves after adding these parity bits
5 – Each of these keys is then used to encrypt the string “KGS!@#$%” using DES algorithm in ECB mode so that the result would be
PASSWOR = E52CAC67419A9A22
D000000 = 4A3B108F3FA6CB6D
6 – The output of the two halves is then combined, and that makes out LM hash
E52CAC67419A9A224A3B108F3FA6CB6D
You can get the same result using the following python line.
python -c 'from passlib.hash import lmhash;print lmhash.hash("password")'

Disadvantages
As you may already think, this is a very weak algorithm,
Each hash has a lot of possibilities, for example, the hashes of the following passwords
Password1
pAssword1
PASSWORD1
PassWord1 . . . ETC
It will be the same!!!!

Let’s assume a password like passwordpass123
The upper and lowercase combinations will be more than 32000 possibilities, and all of them will have the same hash!
You can give it a try.
import itertools
len(map(''.join, itertools.product(*zip("Passwordpass123".upper(), "Passwordpass123".lower()))))
Also, splitting the password into two halves makes it easier, as the attacker will be trying to brute force just a seven-character password!
LM hash accepts only the 95 ASCII characters, but yet all lower case characters are converted to upper case, which makes it only 69 possibilities per character, which makes it just 7.5 trillion possibilities for each half instead of the total of 69^14 for the whole 14 characters.
Rainbow tables already exist containing all these possibilities, so cracking Lan Manager hashes isn’t a problem at all
Moreover, in case that the password is seven characters or less, the attacker doesn’t need to brute force the 2nd half as it has the fixed value of AAD3B435B51404EE
Example
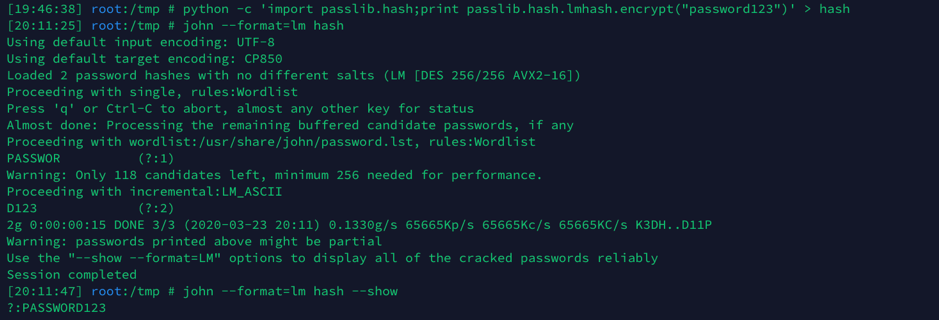
Creating hash for password123 and cracking it.
You will notice that john got me the password “PASSWORD123” in upper case and not “password123”, and yeah, both are just true.
Obviously, the whole LM hashing stuff was based on the fact that no one will reverse it as well as no one will get into the internal network to be in a MITM position to capture it.
As mentioned earlier, LM hashes are disabled by default since Windows Vista + Windows server 2008.
NTLM hash <NTHash>
NTHash AKA NTLM hash is the currently used algorithm for storing passwords on windows systems.
While NET-NTLM is the name of the authentication or challenge/response protocol used between the client and the server.
If you made a hash dump or pass the hash attack before so no doubt you’ve seen NTLM hash already.
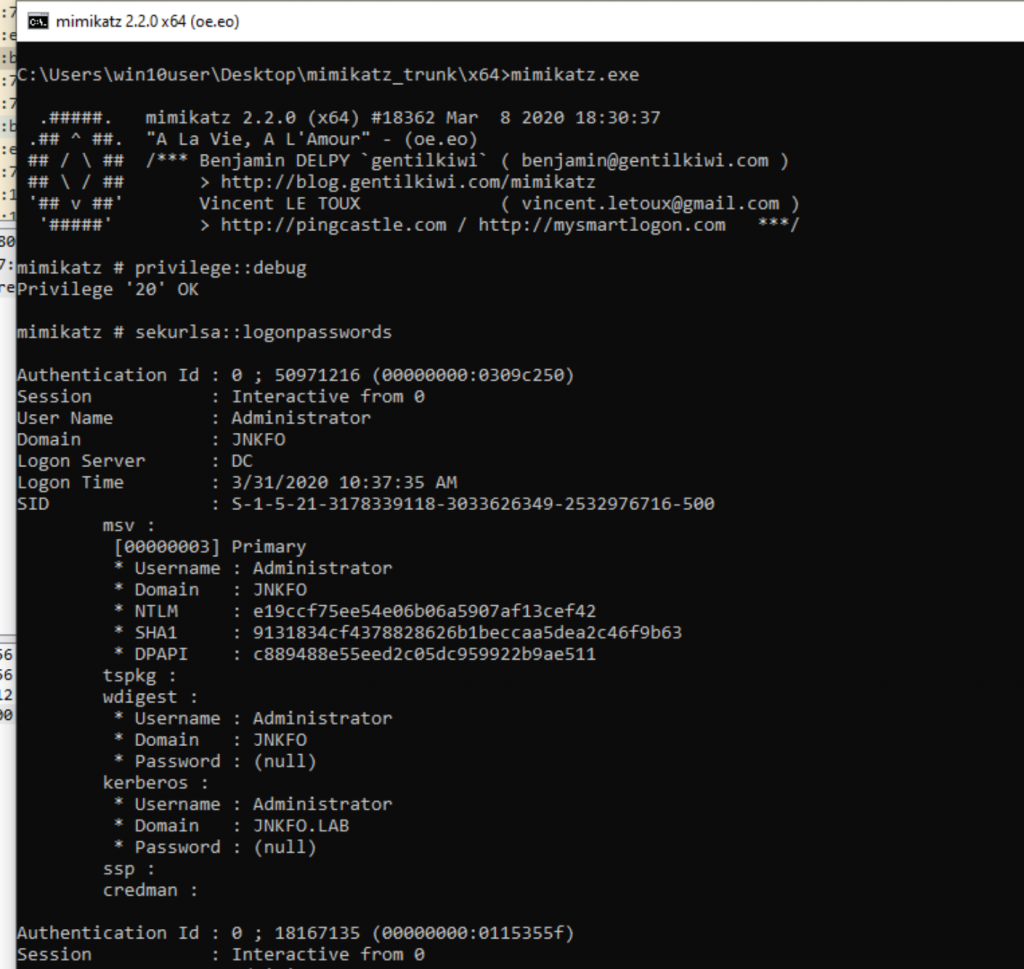
You can obtain it via
Dumping credentials from memory using mimikatz
Eg, sekurlsa::logonpasswords
Dumping SAM using
C:\Windows\System32\config\SYSTEM
C:\Windows\System32\config\SAM
Then reading hashes offline via Mimikatz
lsadump::sam /system:SystemBkup.hiv /sam:SamBkup.hiv
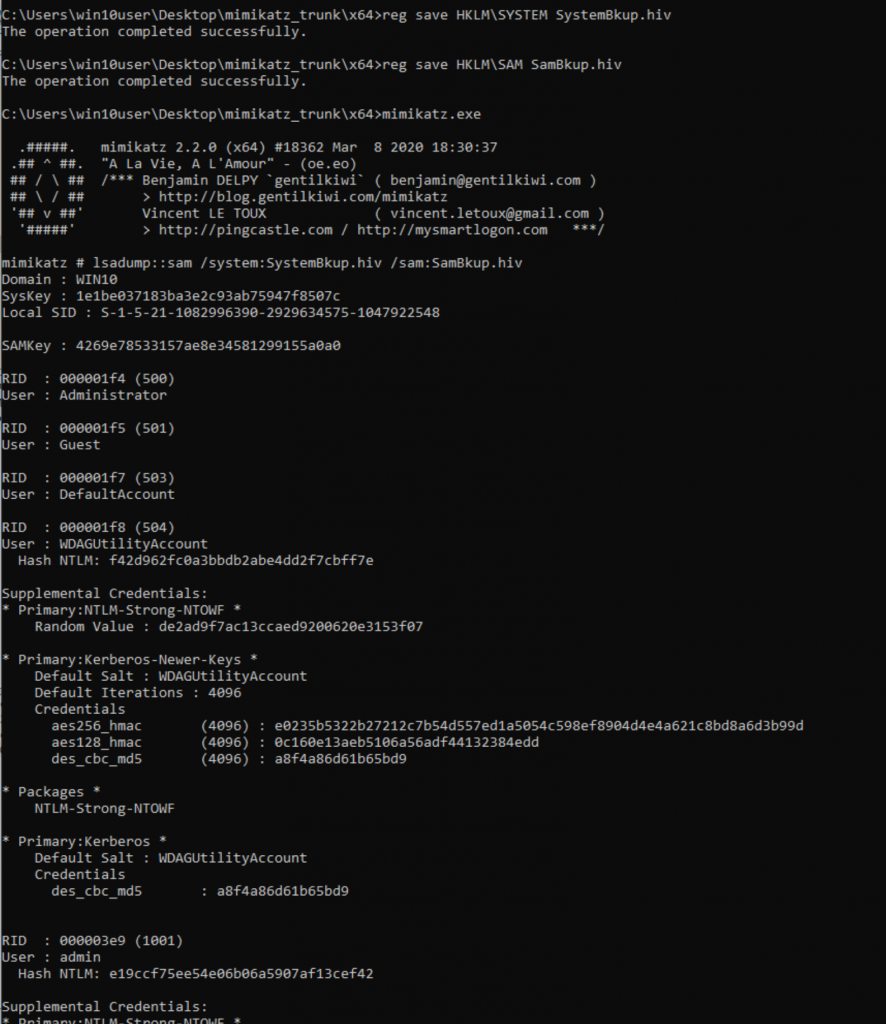
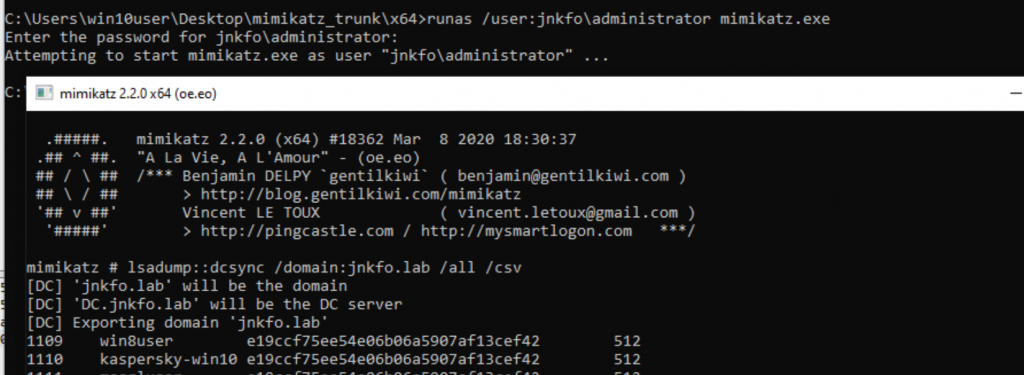
And sure via NTDS where NTLM hashes are stored in ActiveDirectory environments, You’re going to need administrator access over the domain controller, A domain admin privs for example
You can do this either manually or using DCsync within mimikatz as well
NTLM hash generation
Converting a plaintext password into NTLM isn’t complicated, it depends mainly on the MD4 hashing algorithm
1 – The password is converted to Unicode
2 – MD4 is then used to convert it to the NTLM
Just like MD4(UTF-16-LE(password))
3 – Even in case of failing to crack the hash, it can be abused using Pass the hash technique as illustrated later.
Since there are no salts used while generating the hash, cracking NTLM hash can be done either by using pre-generated rainbow tables or using hashcat.
hashcat -m 3000 -a 3 hashes.txt
Net-NTLMv1
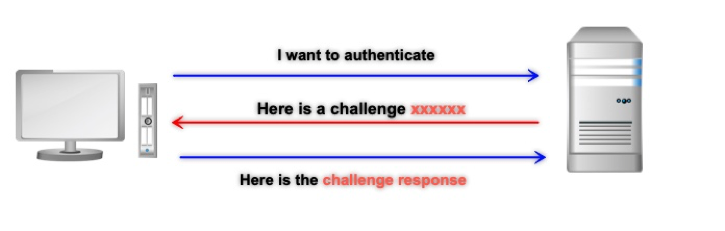
This isn’t used to store passwords, it’s actually a challenge-response protocol used for client/server authentication in order to avoid sending user’s hash over the network.
That’s basically how Net-NTLM authentication works in general.
I will discuss how that protocol works in detail, but all you need to know for now is that NET-NTLMv1 isn’t used anymore by default except for some old versions of windows.
The NET-NTLMv1 looks like username::hostname:response:response:challenge

It can’t be used directly to pass the hash, yet it can be cracked or relayed as I will mention later.
Since the challenge is variable, you can’t use rainbow tables against Net-NTLMv1 hash,
But you can crack it by brute-forcing the password using hashcat using
hashcat -m 5500 -a 3 hashes.txt
This differs from NTLMv1-SSP in which the server challenge is changed at the client-side

NTLMv1 and NTLMv1-SSP are treated differently during cracking or even downgrading, this will be discussed at the NTLM attacks part.
Net-NTLMv2
A lot of improvements were made for v1, this is the version being used nowadays at windows systems.
The authentication steps are the same, except for the challenge-response generation algorithm, and the NTLM challenge length which in this case is variable instead of the fixed 16-bytes number at Net-NTLMv1.
At Net-NTLMv2 any parameters are added by the client such as client nonce, server nonce, timestamp as well as the username and encrypt them, that’s why you will find the length of Net-NTLMv2 hashes varies from user to another.
Net-NTLMv2 can’t be used for passing the hash attack, or for offline relay attacks due to the security improvements made.
But yet it still can be relayed or cracked, the process is slower but yet applicable.
I will discuss that later as well.
Net-NTLMv2 hash looks like

It can be cracked using
hashcat -m 5600 hash.txt
Net-NTLM Authentication
In a nutshell
Let’s assume that our client (192.168.18.132) is being used to connect to the windows server 2008 machine (192.168.18.139)
That server isn’t domain-joined, means that all the authentication process is going to happen between the client and the server without having to contact any other machines, unlike what may happen in the 2nd scenario.
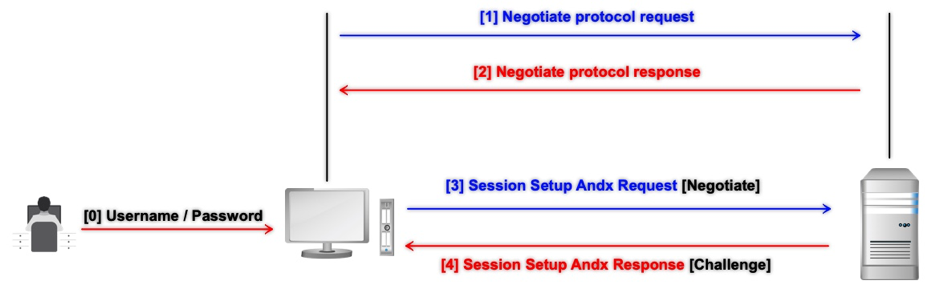
The whole authentication process can be illustrated in the following picture.
Client IP : 192.168.18.132 [Kali linux]
Server IP: 192.168.18.139 [Windows server 2008 non-domain joined]
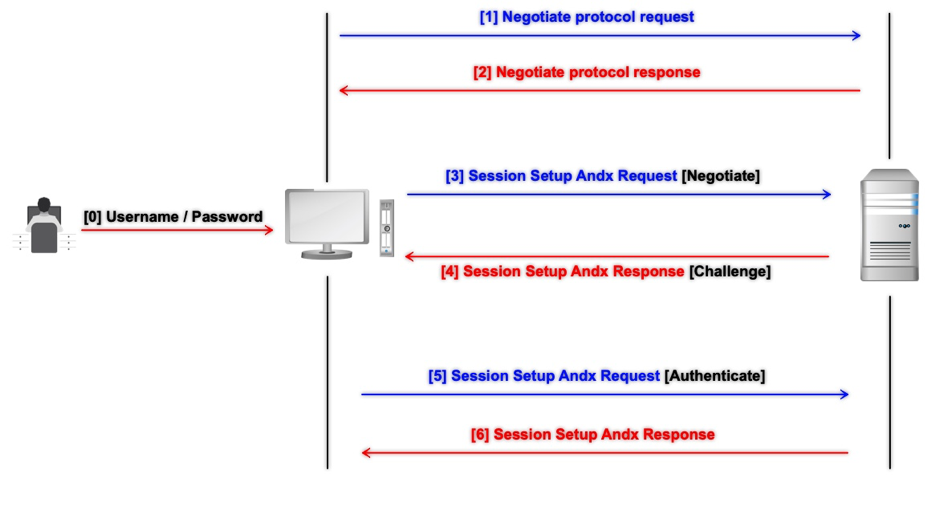
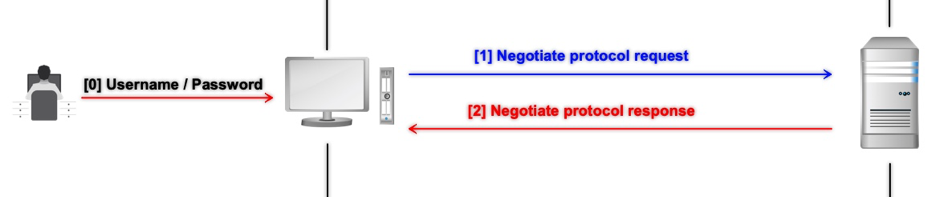
0 – The user enters his/her username and password
1 – The client initiates a negotiation request with the server, that request includes any information about the client capabilities as well as the Dialect or the protocols that the client supports.
2 – The server picks up the highest dialect and replies through the Negotiation response message then the authentication starts.
3 – The client then negotiates an authentication session with the server to ask for access, this request contains also some information about the client including the NTLM 8 bytes signature (‘N’, ‘T’, ‘L’, ‘M’, ‘S’, ‘S’, ‘P’, ‘\0’).
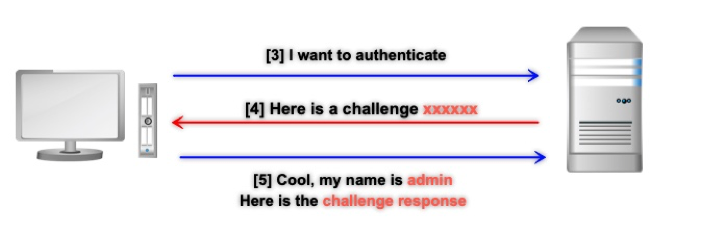
4 – The server responds to the request by sending an NTLM challenge
5 – The client then encrypts that challenge with his own pre-entered password’s hash and sends his username, challenge and challenge-response back to the server (another data is being sent while using NetNTLM-v2).
6 – The server tries to encrypt the challenge as well using its own copy of the user’s hash which is stored locally on the server in case of local authentication or pass the information to the domain controller in case of domain authentication, comparing it to the challenge-response, if equal then the login is successful.
1-2 : negotiation request/response
launch Wireshark and initiate the negotiation process using the following python lines
from impacket.smbconnection import SMBConnection, SMB_DIALECT
myconnection = SMBConnection("jnkfo","192.168.18.139")
These couple lines represent the 1st two negotiation steps of the previous picture without proceeding with the authentication process.
Using the “smb or smb2” filter

During the negotiation request, you will notice that the client was negotiating over SMB protocol, and yet the server replied using SMB2 and renegotiated again using SMB2!
It’s simply the Dialects.
By inspecting the packet you will find the following
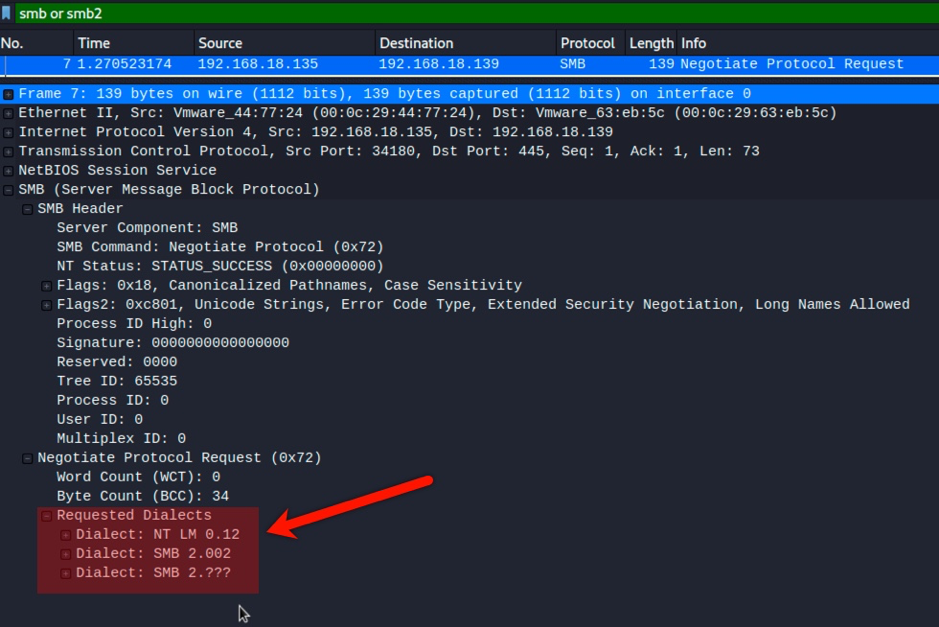
As mentioned earlier, the client is offering the Dialects it supports and the server picks up whatever it wants to use, by default it picks up the one with the highest level of functionality that both client and server supports.
If the best is SMB2 then let it be SMB2.
You can, however, enforce a certain dialect (assuming the server supports it) using
Myconnection.negotiateSession(preferredDialect=”NT LM 0.12”)
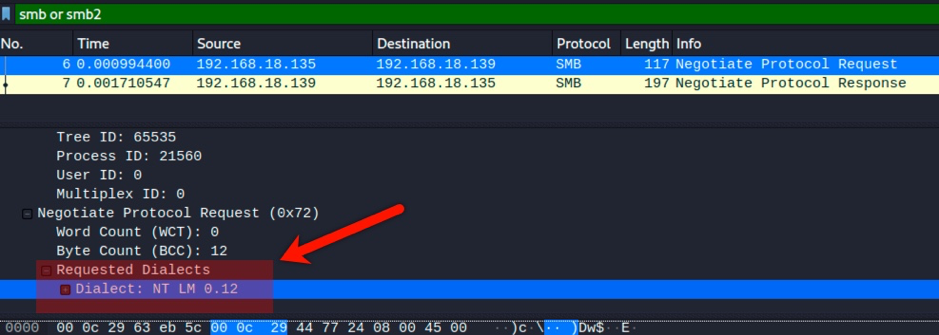
The dialect NT LM 0.12 was sent, the server responded back using SMB, and will use the same protocol for the rest of the authentication process.
Needless to say that LM response isn’t supported by default anymore since windows vista/windows server 2008.
3 – Session Setup Request (Type 1 message)
The following line will initiate the authentication process.
myconnection.login("Administrator", "P@ssw0rd")
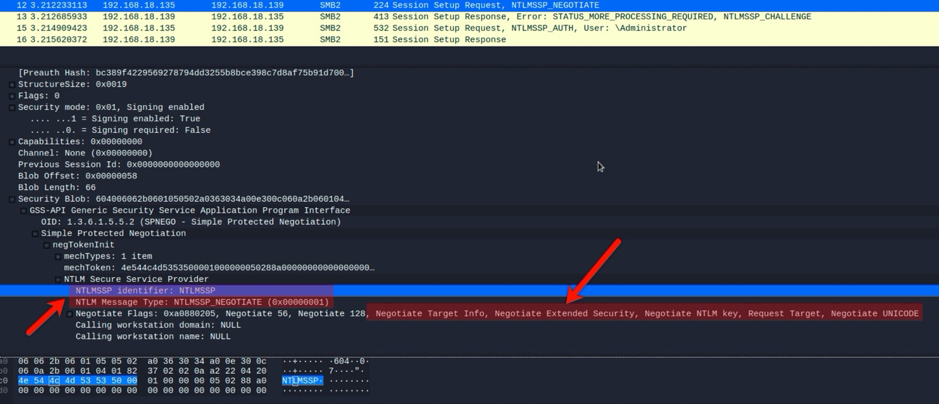
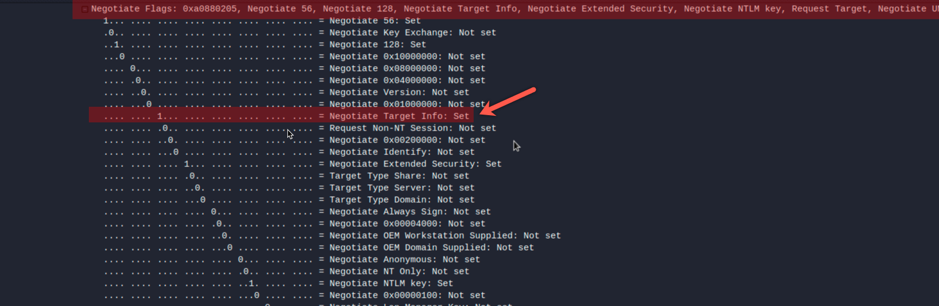
The “Session Setup Request” packet contains information such as the [‘N’, ‘T’, ‘L’, ‘M’, ‘S’, ‘S’, ‘P’, ‘\0’] signature, negotiation flags indicating the options supported by the client and the NTLM Message Type which must be 1
An interesting Flag is the NTLMSSP_NEGOTIATE_TARGET_INFO flag which will ask the server to send back some useful information as will be seen in step number 4
Another interesting flag is the NEGOTIATE_SIGN which has a great deal with the relay attacks as will be mentioned later.
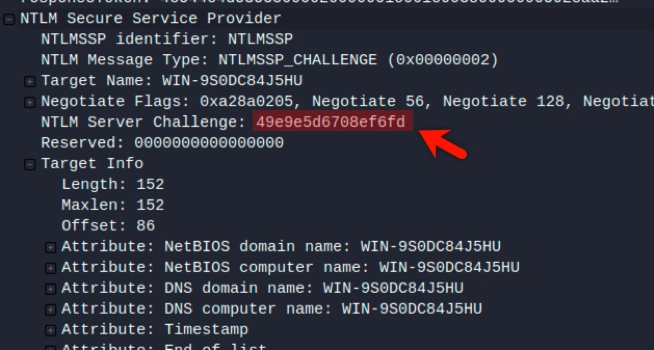
4 – Session Setup Response (Type 2 message)
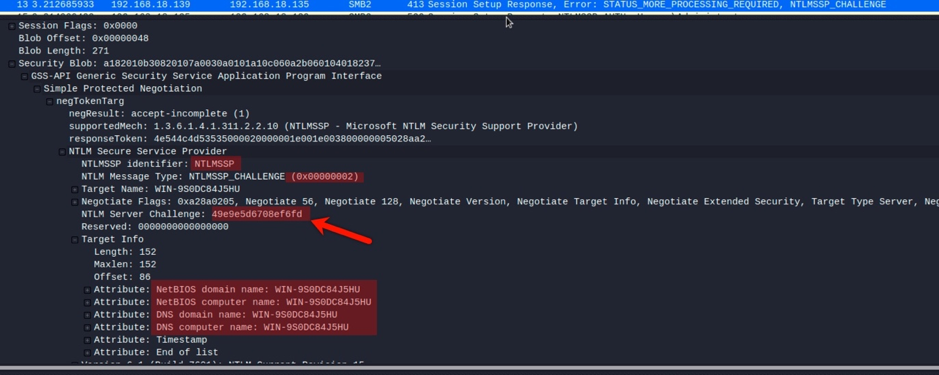
At the response, we get back the NTLMSSP signature again.
The message type must be 2 in this case.
Target name and the target info due to the NTLMSSP_NEGOTIATE_TARGET_INFO flag we sent earlier which provides us with some wealthy information about the target!
A good example is getting the domain name of exchange servers externally.
The most important part is the NTLM challenge or nonce.
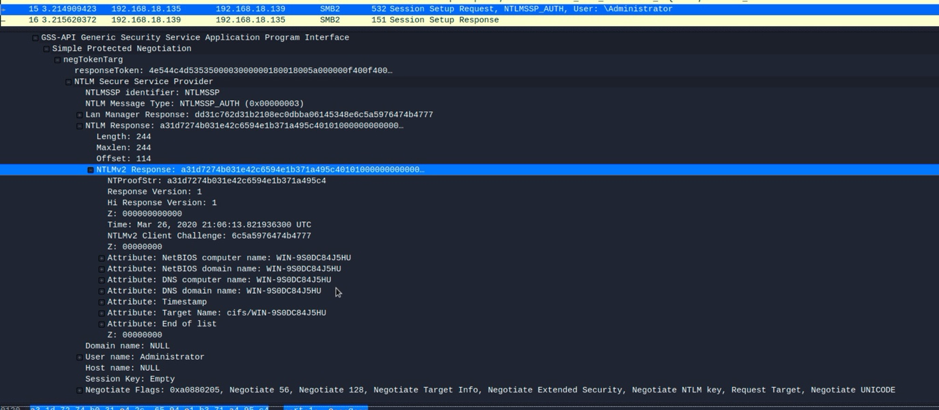
5 – Session Setup Request (Type 3 message)
Long story short, the client needs to prove that he knows the user’s password, without sending the plaintext password or even the NTLM hash directly over the network.
So instead it goes through a procedure in which it creates NT-hash, uses this to encrypt the server’s challenge, sends this back along with the user name to the server.
That’s how the process works in general.
At NTLMv2, The client hashes the user’s pre-entered plain text password into NTLM using the pre-mentioned algorithm to proceed with the challenge-response generation.
The elements of the NTLMv2 hash are
– The upper-case username
– The domain or target name.
HMAC-MD5 is applied to this combination using the NTLM hash of the user’s password, which makes the NTLMv2 hash.
A blob block is then constructed containing
– Timestamp
– Client nonce (8 bytes)
– Target information block from type 2 message
This blob block is concatenated with the challenge from type 2 message and then encrypted using the NTLMv2 hash as a key via HMAC-MD5 algorithm.
Lastly, this output is concatenated with the previously constructed blob to form the NTLMv2-SSP challenge-response (type 3 message)
so basically the NTLMv2_response = HMAC-MD5(text(challenge + blob), using NTLMv2 as a key)
and the challenge response is NTLMv2_response + blob.
Out of curiosity and just to know the difference between the ntlmv1 and v2, How is NTLMv1 response calculated?!
1 – The NTLM hash of the plaintext password is calculated as pre-mentioned, using the MD4 algorithm, so assuming that the password is P@ssw0rd, the NTLM hash will be E19CCF75EE54E06B06A5907AF13CEF42
2 – These 16 bytes are then padded to 21 bytes, so it becomes E19CCF75EE54E06B06A5907AF13CEF420000000000
3 – This value is split into three 7 bytes thirds
0xE19CCF75EE54E0
0x6B06A5907AF13C
0xEF420000000000
4 – These 3 values are used to create three 64 bits DES keys by adding parity bits after every 7 bits as usual
So for the 1st key 0xE19CCF75EE54E0
11100001 10011100 11001111 01110101 11101110 01010100 11100000
8 parity bits will be added so it becomes
111000001 100111000 110010111 011100101 111001110 010010100 1011000000
In Hex : 0xE0CE32EE5E7252C0
Same goes with the other 2 keys
5 – Each of the three keys is then used to encrypt the challenge obtained from Message type 2.
6 – The 3 results are combined to form the 24-byte NTLM response.
So in NTLMv1, there is no client nonce or timestamp being sent to the server, keep that in mind for later.
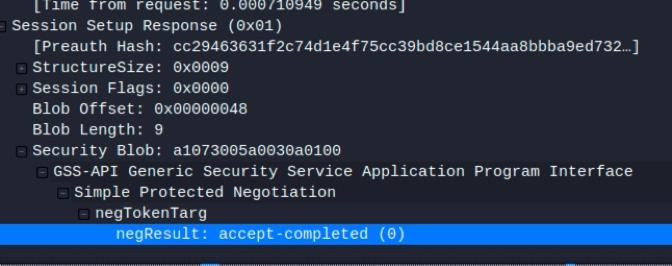
6 – Session Setup Response
The server receives type 3 message which contains the challenge-response
The server has its own copy of the user’s NTLM hash, challenge, and all the other information needed to calculate its own challenge-response message.
The server then compares the output it has generated with the output it got from the client.
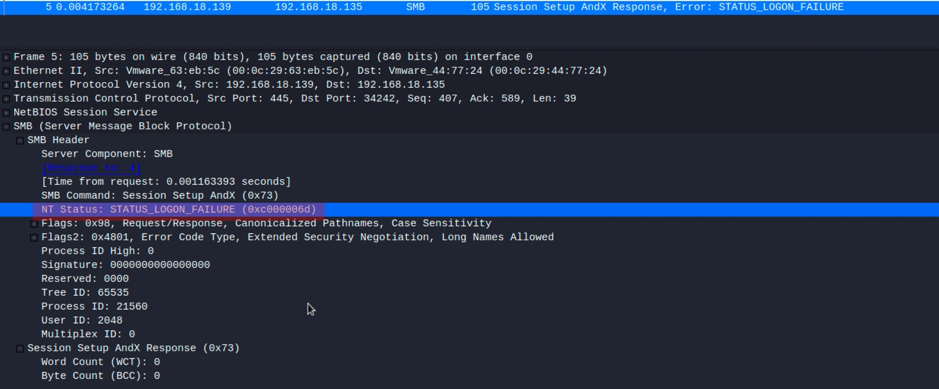
Needless to say, if the NT-Hash used to encrypt the data on the client-side, it differs from the user’s password’s NT-hash stored on the server (The user entered the wrong password), the challenge-response won’t be the same as the server’s output.
And thus user get ACCESS_DENIED or LOGON_FAILURE message
Unlike if the user entered the correct password, the NT-Hash will be the same, and the encryption (challenge-response) result will be the same on both sides and then the login will succeed.
That’s how the full authentication process happened without directly sending or receiving the NTLM hash or the plaintext password over the network.
NTLM authentication in a windows domain environment
The process is the same as mentioned before except for the fact that domain users credentials are stored on the domain controllers
So the challenge-response validation [Type 3 message] will lead to establishing a Netlogon secure channel with the domain controller where the passwords are saved.

The server will send the domain name, username, challenge, and the challenge-response to the domain controller which will determine if the user has the correct password or not based on the hash saved at the NTDS file (unlike the previous scenario in which the hash was stored locally on the SAM).
So from the server-side, you will find the following 2 extra RPC_NETLOGON messages to and from the Domain controller.
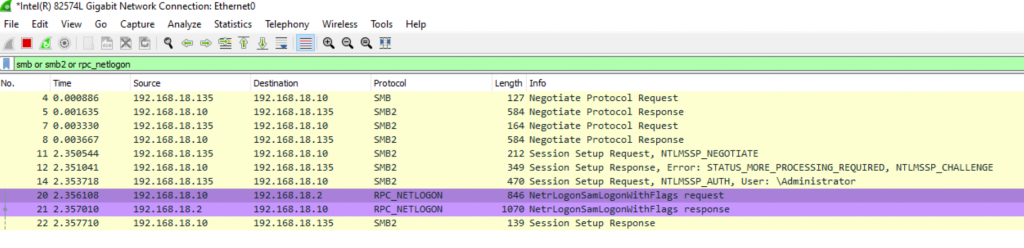
and if everything is ok it will just send the session key back to the server in the RPC_NETLOGON response message.
NTLMSSP
To fully understand that mechanism you can’t go without knowing a few things about NTLMSSP, Will discuss this in brief and dig deeper into it during the attacks part.
From Wikipedia
NTLMSSP (NT LAN Manager (NTLM) Security Support Provider) is a binary messaging protocol used by the Microsoft Security Support Provider Interface (SSPI) to facilitate NTLM challenge-response authentication and to negotiate integrity and confidentiality options. NTLMSSP is used wherever SSPI authentication is used including Server Message Block / CIFS extended security authentication, HTTP Negotiate authentication (e.g. IIS with IWA turned on) and MSRPC services.
The NTLMSSP and NTLM challenge-response protocol have been documented in Microsoft’s Open Protocol Specification.
SSP is a framework provided by Microsoft to handle that whole NTLM authentication and integrity process,
Let’s repeat the previous authentication process in terms of NTLMSSPI
1 – The client gets access to the user’s credentials set via AcquireCredentialsHandle function
2 – The Type 1 message is created by calling InitializeSecurityContext function in order to start the authentication negotiation process which will obtain an authentication token and then the message is forwarded to the server, that message contains the NTLMSSP 8 bytes signature mentioned before.
3 – The server receives the “Type 1 message“, extracts the token and passes it to the AcceptSecurityContext function which will create a local security context representing the client and generate the NTLM challenge and send it back to the client (Type 2 message).
4 – The client extracts the challenge, passes it to InitializeSecurityContext function which creates the Challenge-response (Type 3 message)
5 – The server passes the Type 3 message to the AcceptSecurityContext function which validates if the user authenticated or not as mentioned earlier.
These function/process has nothing to do with the SMB protocol itself, they are related to the NTLMSSP, so they’re called whenever you’re triggering authenticating using NTLMSSP no matter the service you’re calling.
How does NTLMSSP assure integrity?
To assure integrity, SSP applies a Message Authentication Code to the message. This can only be verified by the recipient and prevent the manipulation of the message on the fly (in a MITM attack for example)
The signature is generated using a secret key by the means of symmetric encryption, and that MAC can only be verified by a party possessing the key (The client and the server).
That key generation varies from NTLMv1 to NTLMv2
At NTLMv1 the secret key is generated using MD4(NTHash)
At NTLMv2
1 – The NTLMv2 hash is obtained as mentioned earlier
2 – The NTLMv2 blob is obtained as also mentioned earlier
3 – The server challenge is concatenated with the blob and encrypted with HMAC-MD5 using NTLMv2 hash as a key
4 – That output is encrypted again with HMAC-MD5 using again NTLMv2 hash as a key HMAC-MD5(NTLMv2, OUTPUT_FROM_STEP_3)
And that’s the session key
You’ll notice that to generate that key it requires to know the NThash in both cases, either in NTLMv1 or NTLMv2, the only sides owning that key are the client and the server.
The MITM doesn’t own it and so can’t manipulate the message.
This isn’t always the case for sure, and it has it’s own pre-requirements and so it’s own drops which will be discussed in the next parts where we’re going to dig deeper inside the internals of the authentication/integrity process in order to gain more knowledge on how these features are abused.
Conclusion and references
We’ve discussed the difference between LM, NTHash, NTLMv1 and NTLMv2 hashes.
I went through the NTLM authentication process and made a quick brief about the NTLMSSP’s main functions.
In the next parts, we will dig deeper into how NTLMSSP works and how can we abuse the NTLM authentication mechanism.
If you believe there is any mistake or update that needs to be added, feel free to contact me at Twitter.
References
The NTLM Authentication Protocol and Security Support Provider
Mechanics of User Identification and Authentication: Fundamentals of Identity Management
[MS-NLMP]: NT LAN Manager (NTLM) Authentication Protocol
LM, NTLM, Net-NTLMv2, oh my!